14 Jun DIY Flag Canvas
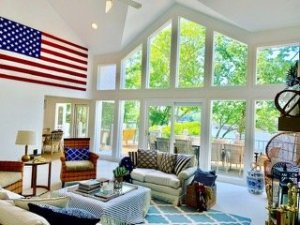


Hi Friends! Welcome to the Massie Lake House – where we treasure Lake Life, Creating Family Memories and Fun in the Sun! When we first toured this home in 2017 I knew I wanted to hang a giant flag in the two story great room. And I’m so excited to share with you how we created this beautiful piece of art in 10 quick steps!
-

It was a sad, empty wall!
I’d been drooling over this Pottery Barn framed flag for a long time. But the dimensions weren’t quite big enough. And… it’s nearly $900. And… let’s be real. Ya’ll know I like to make stuff on my own!
With the help of my crazy talented brother Cameron, (seriously, the dude can build anything I dream up!) we gathered up some tools, hit the lumber aisle and made a few Amazon purchases. We rolled up our sleeves and knocked this project out in one afternoon over Memorial Day Weekend. It was the perfect start to Lake Season!
Supplies:

*Referral Links below. These affiliate links are a list of my favorite tools that do not increase your cost, but may result in a small commission to Cara Massie Design.
- Miter Saw (a circular saw or hand saw will also work)
- Saw Table
- Kreg Jig
- 1 1/4″ Pan Head Kreg Jig Screws
- Kreg Face Clamp
- Tape Measure (Stanley FatMax is my favorite!)
- Wood Glue
- Carpenter’s Marking Pencil
- Speed Square
- Air Compressor
- Pneumatic Staple Gun
- Cordless Drill
- American Flag
- White bed sheet
- 4 Pieces of 1′ x 4′ x 10′ Pine (the drier the better)
- Sandpaper block
Step One: Measure
Lay out your Flag and measure. This gorgeous American Flag from Amazon sports beautiful colors, embroidered stars and is a steal at only $76 for a 5′ x 8′ flag. That’s a whole lot less than $900!
Step Two: Make a list
Create a Cut List and Rough Drawing.

Cut List: (the list of lumber cuts needed for the project) You will want to create a frame that is 2″ shorter all around than the dimensions of your flag. Your lumber will be roughly 3/4″ thick. And you’ll need 1″ overhang of fabric to staple to the frame.
For a 5′ x 8′ Flag you would create a cut list as:
2 Vertical Pieces: 48″. 2 Horizontal Pieces: 94″
Step Three: Cut The Frame Pieces
- Create the Frame. Lay out your boards and make the appropriate measurements using your tape measure, speed square and marking pencil.
- Using a Miter Saw cut all lumber pieces per your cut list. A circular saw will also work. If necessary use a hand saw (but only as a last resort. Power tools rock!)
-

-

All the guys lent a hand!
Step Four: Create Pocket Holes in the Frame Pieces
Use your Kreg Jig, clamps and cordless drill to create pocket holes in the vertical boards. Trust me on this. Kreg Jig’s are amazing. All the cool kids have one. I promise that you’re going to want one in your life! Kreg Jig’s make joinery (connecting two boards) easy peasy!


For more information on how (and why) to use a Kreg Jig check out two of my favorite woodworking sisters Ashley & Whitney of Shanty2Chic. How To Use A Kreg Jig.
Step Five: Build The Frame
- Spread a little wood glue where the boards will be joined. Remember the Elementary School Art Teacher rule “A Dot Is A Lot” – don’t glob it all over your project.
- Use the Kreg Face Clamps to ensure your boards are flush creating a large rectangle frame.
- Using a cordless drill, the Kreg 1 1/4″ screws and the Kreg bit to screw the vertical and horizontal boards together. Do not overtighten.

Step Six: Create Corner Braces
- Create Corner Braces to ensure frame strength
- Measure from one corner horizontally 8″
- Using a Speed Square strike a line at 45 degrees.
- Lay a scrap piece under the frame and line up your board with the mark.
- Mark where cuts should be made for the brace to join inside the frame.
- Cut the corner braces.

Step Seven: Attach Corner Braces
- Using a clamp place the corner braces in the Kreg Jig.
- Make sure to orient the boards at the angle that was cut
- Use a cordless drill and the Kreg bit to create pocket holes.
- Repeat the instructions in Step 5 to attach the corner boards to the frame.


Step Eight: Create Vertical Braces
- Measure the interior of your frame.
- Cut two vertical support braces for extra stability.
- Repeat the Kreg Jig Process and attach the vertical support braces to the exterior frame.

Step Nine: Attach The Flag
- Lay your flag frame on saw horses or large folding tables.
- Run a sanding block over the frame to prevent any fabric snags.
- Lay your flag over the frame and iron out any wrinkles.
- Using a pneumatic staple gun attach a white bed sheet to the frame. You could also use an Electric Stapler. Whatever you do, do not attempt this with a manual stapler. Your hand will fall off. Trust me.
- Ensuring that you keep your flag stripes straight stretch your flag very taught and staple as you go.
- Follow up with a hammer to tap in any staples that aren’t flush.
If you happen to have an entire house full of Memorial Weekend guests it’s helpful to require all of them to participate in this step! For a smaller version of this project you’ll just need one extra set of hands. If you’re creating a giant flag canvas recruit some extra help!


Step Ten: Hang & Enjoy!

I am so in love with how this project turned out! I’ve kept with a classic red, white and blue decor palette throughout our Lake Home and this flag is the crown jewel. It’s visible from every area of our home. She’s a constant reminder of how grateful we are to those who have served our country. I smile each time I pass by it and think fondly of the three men pictured below (my grandfathers and my father in law). They are all so missed!


Enjoy the remainder of your summer my loves and I would love to see your flag decor! Please share!

1 Comment